 釣果アルバム
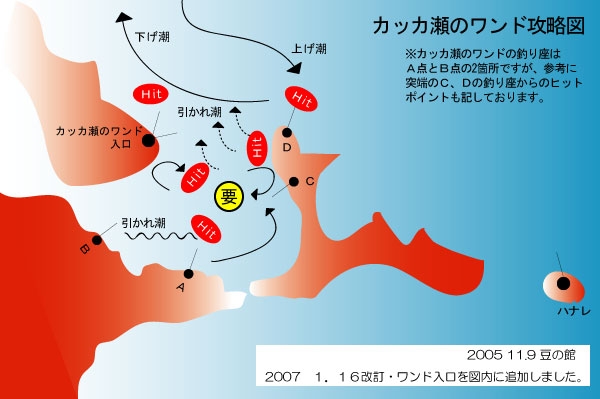
私は相島釣行に必ず3号ロッドと、それに合わせて5号〜10号のハリスを常備しています。
これは単に、マダイやヒラマサ用だけに限らず、シーズン中、波の高い日が多い日本海の釣り場の中で、相島、特にカッカ瀬の様に波高3mでも何とか釣りが出来る釣り場のために有ります。
カッカ瀬は、通常の磯釣りで、瀬上がり出来ないような海況でも釣りが出来ると言うことで、磯の足場が高いのは当然ですが、要はワンドの裏側に渡船を瀬付け出来る事にあります。よってワンドの釣り座は、潮も波も普通じゃない状況で釣りをする事になるのです。磯にぶち当たって上下する波の高低差は6メートルを越える事もあり、魚を掛けてせっかく足元まで寄せても、細い仕掛けでは、タモ入れ時に魚が大きな磯波にもまれて取り込みにくく、魚の姿を見てバラす悔しい思いをする羽目になる可能性が高いため、太い仕掛け使います。多くの方は磯のフカセ釣りにおいて使用するハリスは、大方1.5号〜2号または太くて3号と言う所ではないでしょうか?普通はそのスタンダードな仕掛けで、竿さばきのテクニックなどで魚をあしらい大型魚を仕留めますが、カッカ瀬では、そんな余裕なし!力勝負でしか活路は見出せません。そんな理由で著者のカッカ瀬ハリスは平均5号なんです。
解説の要点
1:サラシと潮流 2:仕掛けとラインメンディング 3:釣り座別の狙い方
ワンド内はサラシで洗濯機状態なので、ヒットポイントを想定するための「潮読み」はカッカ瀬に慣れていない人は、難しいと言うより、殆ど見当も付かないと言うのが本音ではないでしょうか。しかし良く観察すると、上図に示すようにサラシの中に流れの中心が有って(図では「要」と記しています)そこを中心に潮が動いています。ワンドの外を流れる本流や打ち寄せるウネリの度合いによって「要」の位置が変化しますので、仕掛けを何度も打ち返して、ウキの流れ方が安定する場所を探します。流れの「要」の位置は、本命の下げ潮の場合、図に示す所に来る事が多く、潮が悪い時は、ワンド内の左右により過ぎたり、手前に突っかけて来て釣り座から足元に横一線にサラシの泡の線が出来ます。その様な時は何も釣れないか、バリくらいしか当りません。Bの釣り座からは、右に行く「引かれ潮」を狙うか、向かいの瀬に出来る反転流を狙うかどちらかです。Aの釣り座では「要」の位置次第ですが、ヒットポイントの想定の選択肢が多く釣り易いです。ただウネリが強い時は返し波が強いので、仕掛けを投入する位置が重要なカギを握りますので、難しい時もあります。Aの位置から上手く流して、C〜Dの磯際で好釣した経験が多数あります。マキエについては潮の「要」の周辺を取り囲む様に打つと良いでしょう。
カッカ瀬では太仕掛けを使うとはじめに記しましたが、仕掛けの操作に難点がいくつかあります。通常は移動仕掛けで、オモリは1号程度の重い仕掛けにします。何故なら大サラシの中では仕掛けを投入した直後にすぐさまタナを取れないとウキがサラシに乗ってポイントを外してしまうからです。仕掛けが底に入ると、ウキは安定し本来の流れに乗るので上手く流せます。しかし太いラインを使うと大きな潮の抵抗で仕掛けが入らず(鉛が沈まない)潮の表面をなめるように進みますので、全く当て外れの結果に繋がります。ウキが滑るように流れる時は、すぐ回収してチェックして下さい。したがって、仕掛けをサイズダウンすると、ラインメンディングは飛躍的に良くなり、魚が食う確立はかなり上がりますが、取り込みが難しくなります。ここでは、魚とのやり取りにおいて、単純に魚の引きの力だけと戦うのではなく、渦巻く波の力がそれにプラスされる事をお忘れなく。大型のマタイなどが来たら3号程度のハリスでは取り込める確率が低くなります。
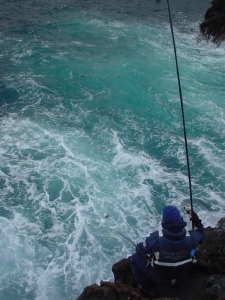
Bの釣り座付近から見たワンド内。
すでに先に述べましたが、釣り座によって狙うポイントがハッキリ、クッキリと分かれます。
Aの釣り座からは、Bの釣り座から来る「引かれ潮」を狙えません。仮にAの位置からBの辺りにウキを入れても、良い流れに乗らないからです。例えばBの釣り人がそこでヒットさせていたとして、Aの釣り人がBのポイントに仕掛けを入れても、投入される位置の違いで、全く違う方向にウキが流れてしまいます。理由はAの位置のサラシが邪魔をするからです。仕掛けが一直線に入って行かないのです。後は他に当てはめて応用すれば、何となく攻略法が見えて来るはずです。
カッカ瀬へ戻る | ポイント解説トップへ | 管理人室
Copyright (C) 2001~2010 mamenoyakata. All Rights Reserved.